My Instagram Feed

Saturday, March 27, 2010

Chicken Parmigiana

Sometimes Hubby looks up recipes for me to make. I get bored of our staples (mainly Mexican & Italian variations), and he came across this gem. It was perfect, as I had all the ingredients on hand. It was simple, and tasted divine. We've now had it a few times. I've tried once with the home made sauce, and once with store bought. Both were good; home made was better. I would love to make it with fresh tomatoes one day too, instead of canned. I placed the chicken on some pasta with extra sauce and served with a salad.

Here is the recipe.

Below, I copied and pasted directly from the link. All photos are from www.exclusivelyfood.com.au :


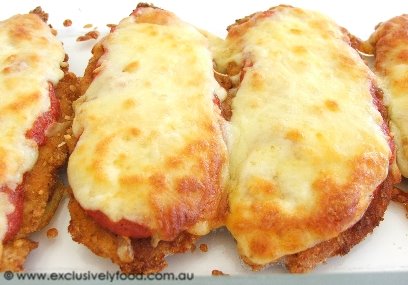
Tender pieces of crumbed chicken are topped with homemade tomato sauce and grated cheese, and then oven baked until the cheese is golden and melted. The tomato sauce and crumbed, uncooked chicken can be prepared in advance but it is best to cook the chicken and assemble the dish just before it goes into the oven.

Serves 4-5.

Tomato Sauce

Makes about 1 1/3 cups.

20ml (1 tablespoon) oil
1/2 medium onion, peeled and finely chopped
2 large garlic cloves, peeled and crushed
400g can crushed/diced tomatoes
1/2 teaspoon dried basil
1 1/2 teaspoons brown sugar, firmly packed
Salt and pepper

Crumbed Chicken
400g skinless chicken breast fillets or tenderloins
2 eggs
20ml (1 tablespoon) milk
50g (1/3 cup) plain flour
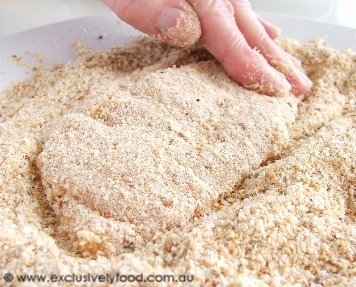
About 150g (about 1 1/3 cups) packaged breadcrumbs
About 125ml (1/2 cup) oil, for frying

Cheese Topping
140g (1 1/3 cups, firmly packed) grated mozzarella cheese
40g (1/2 cup, lightly packed) grated tasty cheddar cheese
22g (1/4 cup) grated parmesan cheese

Heat oil in a heavy-based medium saucepan over medium heat. Add onion and garlic and cook, stirring occasionally, for about 5 minutes, until onion has softened but not browned. Add tomatoes, basil and brown sugar, increase heat and bring to the boil. Once boiling, reduce heat and simmer for about 35-40 minutes, stirring occasionally, until sauce has reached the desired consistency. Add salt and pepper to taste. Set aside for 10 minutes, and then puree sauce in a blender or food processor.

Trim any fat from chicken. If using chicken breasts, cut them in half horizontally. Cover chicken with a freezer bag and lightly pound with the flat side of meat mallet to flatten. © exclusivelyfood.com.au

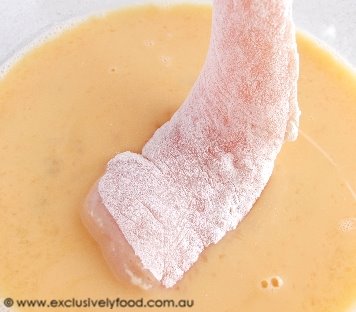
Whisk eggs and milk together in a bowl. Coat one piece of chicken in flour and shake to remove excess. Then dip the chicken into the egg and milk mixture ensuring that all of the flour is moistened.

Then coat the chicken in breadcrumbs, pressing firmly to ensure crumbs adhere. Repeat with remaining pieces of chicken.


To fry chicken, heat some of the oil in a heavy-based frying pan over medium-high heat. We cook the chicken in two batches using 1/4 cup of oil for each batch (the number of batches will be determined by the size of your frying pan and you'll need to divide the oil evenly between each batch). Fry the chicken in a single layer, without overcrowding the pan, until golden brown and cooked through.

Wipe the pan out with paper towels between each batch of chicken to remove any crumbs. This prevents the overcooked loose crumbs adhering to the next batch of chicken.

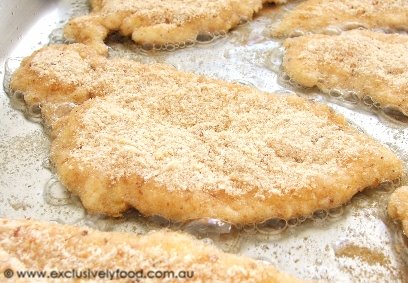
Drain cooked chicken on paper towels.

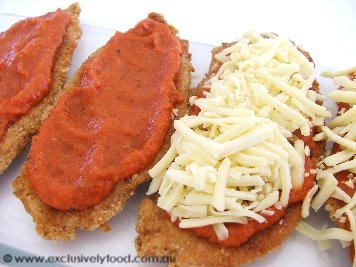
Place cooked chicken in a large baking dish and spread with sauce. Sprinkle with combined cheeses.

Bake at 200 degrees Celsius (180 degrees fan-forced) for about 15-20 minutes, or until cheese is melted and golden. We sprinkle the chicken parmigiana with chopped parsley before serving. © www.exclusivelyfood.com.au


Read more...

Friday, March 19, 2010

Red Velvet Cake


I've been wanting to try this for ages now. Whenever I read a cupcake blog, people comment on how red velvet is their favorite. I figured I must be missing out on something amazing. I did some research, but I always go back to my trusty Bakerella. I used her recipe, since I've really enjoyed her other cake recipes. I halved it, since we just never eat as much as I think we're capable of (I even gave half away, and still had to throw away left overs). I should have maybe quartered it (though the ratios might not be right at such a small percentage). But I know I should have at least then baked it in 3 or more layers. My oven! I just can't complain enough about it. IT WILL NOT BAKE ANYTHING DENSE. I need this pounded into my skull. Needless to say, I ended up, yet again, with a soggy centre, and burned top.

The cake was good. Not amazing. Hubby really liked it, but I think it's the cream cheese icing that does it. I'm not the hugest cream cheese fan, so honestly, I prefer a trusty white or chocolate cake with buttercream icing. No need to get beyond kids birthday party cake for me.

The only adjustments I did was use a few drops of gel paste food colouring (instead of a bottle or liquid), and I decreased the cream cheese in the icing. I also sprinkled coconut on top, which I think made the cake so much better. I might try this recipe again in cupcake version, or more layers next time.

Read more...

Wednesday, March 17, 2010

Ankle Update

I didn't think I would need to do another one of these. I am constantly frustrated at how long this injury is taking to heal. I am still at physio...I've been a total of at least 28 times. That's at least 16 hours of physio appointments, 28 hours of driving, another 20 hours of finding a parking spot and walking to the hospital, for a grand total of 64 hours of just physio related time. Then there are Dr's appointments, emergency visits, specialist appointments, pain clinic appointments...all too numerous to remember. All for a stupid broken ankle! It's insane.

My physio therapist is going away in April. She wants me done by the end of March. I'm trying my hardest, but set backs are a bit of a worry for me after the last time. The last one I had took months to settle down. I'd irritated my Achilles tendon. I'm now finally back on track, starting with jumping again - the first step in dynamic movements to enable me to jog again. I am able to hop on two legs with no pain. I am able to hop on the bad foot with some pain, about 6-8 times before I need to stop.

This week I am supposed to go for my first jog! Albeit, and VERY small one. The first time I will be allowed (and able, hopefully) to JOG. Wow. It'll have been 432 days since I was last able to jog.

My flexibility is seeming to level out about now. I still feel like I am just stiff, and that I should be able to keep pushing it, but it's so hard. And discouraging. I keep reminding myself it could be years, if ever, that I am able to walk up and down hill normally. I am a steady 9cm knee-to-wall, sometimes 10. But those last 3-4 cm are huge in reaching fluid movement, I'm finding. My balance and strength are almost perfect. I can now balance on my tippy toes on my bad leg for 20 seconds, 30 on a good day. Same as my good foot. Single leg heel raises are the same too. Even with that, it took a year to build up that strength again (including set-backs).

Through all this, I am incredibly grateful for physiotherapists. I just can't sing their praises highly enough. If I can offer one word of advice from all this, if you injure yourself, do whatever you can to get a Dr's referral for physio. I went to see specialists who didn't think I needed physio, but I insisted (having needed physio in the past a few other times, I already knew the importance). I shudder to think of my progress had I not had instruction on how to go about stretching and exercising my ankle this past year. Even if you have to pay for it, go a few times and get them to write down your exercises. Then go back as often as possible, doing your exercises diligently. I was lucky to be referred by the specialists to the physio centre at the hospital, so I've had my physio sessions included in my general heath care.

Being away on holidays with my sister and brother-in-law for the past 11 days has had some ups and downs with the ankle. We did a lot of swimming, some minor hiking and walking, but it's been enough to cause some swelling and soreness. Nothing too major, but I see that returning to normal is still a little way off yet. I had to force myself to do some things, but it was good to see that I could do it. I'm just so glad I was able to do just about everything everyone else could, and didn't miss out on anything major.

I'll share some holiday photos later...

Read more...

Monday, March 8, 2010

Animals


I can't resist my little furry Monster! I've always been a huge cat fan. I love dogs too, but there is something challenging about a cat - it takes a real effort to get to their little hearts of stone. Even then, I don't think they actually like ME. They like that I feed them. Though, I do tend to have a connection with Seti (at least I have talked myself into that idea). He will actually come when I call him! That almost never happens with cats. I had one other cat about 10 years ago who came when I called him...until the neighbour started feeding him...Ok, I guess I must concede that cats do not actually care about me, but rather care about the fact that I am the one who gives them treats and chin rubs.

As soon as we live in a real house, I cannot wait to get a cat! Until then, Seti will be my substitute. He pretty much lives here now anyway. He seems to only go home to eat, as far as I can tell. Lately we've been watching storms together, so these photos are from the past few storms we've had:


And this is what he likes to do to let us know he wants some milk:
Yet he never jumps on the counter top. What an irresistible little monster.


______________________________


Now for another type of animal. This one, also furry, likes to get in out of the rain too. This one I do not like one little bit. I couldn't care less about their little hearts. This one get the shoe treatment, not the spoiled rotten treatment. This ones make me not be able to sleep at night, and keeps me on edge all the time.

This one has 7 legs, and that white dot on its head? That's its eyeball cluster reflecting the light from my camera flash. *SHUDDER* It looked to be about 3.5" or about 9cm

Read more...

Friday, March 5, 2010

Mocha Brownie Cheesecake


I kind of made this one up; it ended up being pretty good. All I did was mix a few recipes together, no real improvisation here.

I used my new favorite recipe, Cappuccino Brownies, from The Essential Dessert Cookbook. The cheesecake part is from Women's Weekly Cupcakes, Cheesecakes, Cookies cookbook, except I simplified it. Then I added chocolate covered coffee beans on top.

Method:
1. Make cappuccino brownies (recipe here) and cool. I baked these in a round cake tin, and then transferred it to a spring form pan once it cooled. I had extra brownie mix (I didn't want the base too thick on the cake), so I baked the left overs in a small cupcake tin.
2. Make Cheesecake (recipe below), and add on top of cooled brownie base.
3. Make chocolate covered coffee beans (instructions here). Or buy them. But making them is SO easy, and cheap. Granted, they are not quite so pretty as the ones from Starbucks, but they do the trick :) Sprinkle some on top before serving.


Tips:
I lined the base of the springform with baking paper so I could slide the cake off for serving. I also lined the sides so the cheesecake wouldn't stick to the pan. This worked really well.

___________________________

Tiramisu Cheesecake

Ingredients:
2 tsp gelatin
2 tbsp water
125g cream cheese (about 4.4 oz, no huge need to be that accurate)
1/4 cup icing sugar
250g mascarpone cheese
2 tbsp Marsala (I used Kahlua, since it's all I had on hand)
300mL cream, whipped

Method:
1.Sprinkle gelatin over water in small heatproof bowl, or double boiler. Stand in a small pan of simmering water and stir until gelatin has dissolved. Cool for a few minutes.
2. Soften cream cheese to room temperature and add icing sugar in a bowl. Beat until smooth with an electric mixer.
3. Add mascarpone and Marsala (Kahlua) and beat until combined.
4. Stir in gelatin mixture.
5. Fold in whipped cream
___________________________


Now, for the cutest little mini versions!

Like I said, I had left over batter, so I decided to try some bite sized cheesecakes (of course, my inspiration for mini desserts comes from Bakerella).

"Ingredients":
Brownie mixture
Cheescake mixture
Choc covered coffee beans
baking paper
tape
mini cupcake tin & liners

Method:
1. Line mini cupcake tin with liners, and put a small spoonful into each liner. Bake as per recipe, but for less time.
2. Allow brownies to cool. Take off paper liners.
3. Cut small strips of baking paper, or waxed paper, about 2 or 3 times the height of the brownies.
4.This can be the frustrating part: form tubes around each brownie and tape closed. I rolled my mini brownies on the paper, as if I was wrapping a present. I had tape pre-cut so I could quickly secure the paper.
5. Stand brownies on a plate, etc, and pipe or spoon cheesecake mixture into the tubes.
6. Chill and top with coffee beans. Unwrap baking paper, and enjoy :)


Read more...

Monday, March 1, 2010

GOLD!

Oh my goodness, I can't not say anything - THAT WAS INCREDIBLE! I'm by no means an Olympic fan. I didn't even see one lick of coverage during this Olympics. Not because I didn't want to - afterall, I am from Vancouver (or just outside of it), but we don't have a tv. And I couldn't find live internet footage. Not to mention we have to pay per MB used (online video = $$ down the toilet). I did manage to see the OT period of the US vs Canada men's hockey game for Gold though, and, like all the other Canucks abroad, I am so proud to be a Canadian! That was incredible! And I can't imagine a better competitor than the US. It was a game to be proud of for both sides! Nothing better than a worthy opponent, especially for a game like this. Congratulations Canada! And Congratulations USA!

Read more...